


CabinetAhh the cabinet. The foundation for the whole thing. What sets it apart from just running M.A.M.E on your desktop computer and using the up, down, left and right arrows as your joystick. Yuck. Anyway a good bit of your time and money will be devoted to this aspect so plan, plan and then plan some more. Final post-build specs on the cabinet are: Height= 77", Width= 26.5", Weight= 'heavy as hell'. What do you mean plans?Yeah I said it. You need plans. This coming from someone who throws away instructions with the box of the gas grill cause "I can figure it out." So you will be a lot better off if you think long and hard how you want the cabinet to look when its all said and done. There are quite a few designs and plans floating around the internet. Some are free and some you have to pay for. A lot of cabinets are based on a design by Lusid. Many a great cabinet was based on designs like these. You can always tweak things here and there to your liking but it is good to have somewhere to start. After much window shopping I decided I liked the look of the cabs at Mameroom.com. Particularly the look of the Ultimate Arcade II. So despite it not being "free-fifty" as I typically like things to be on the internet, I ponied up the $30 for the illustrated plans for the Ultimate Arcade II. Needless to say it was money well spent. They also offer custom cut out templates but I passed. I used the plans they sold me and using those measurements made my own templates out of taped-together sheets of posterboard. A little more work but it beats drawing and erasing on your wood all day. I then traced my templates onto my wood and went from there. The Wood...My entire cabinet is constructed from 3/4" thick 4X8 sheets of heavy-ass MDF (Medium Density Fiberboard). I believe roughly 4 sheets total. Some claim to use 5/8" but I wasn't able to locate that thickness in my area. It may not seem too heavy as your working, but once that cabinet is together it is one heavy mother. Build it and they will come...With that I started building. Measure 10 times and cut once. Or go buy more wood and cut again. Invest in a mask if you are going the MDF route. It puts out a lot of sawdust. I have heard of folks being sick for weeks after inhaling that stuff for too long. I cut out the wood from my templates using a jig saw (for the curves and turns) and a circular saw for the long straight (at least in theory they are straight) cuts. I lightly sanded my edges as I went. Most of it went together with wood glue and 1" wood screws countersunk roughly a 1/4". I placed wood putty in the holes, let it dry and sanded it flush. At a few of the joints where wood didn't match up perfectly (at some of the steeper angles) I ran a bead of caulk on the inside so that I didn't have any stray light penetration through the back or sides and interfereing with my marquee lighting and monitor picture later on. I also bought four casters and mounted them on the bottom. It certainly made moving this beast a little easier as you are working. It does not however help you move it up two flights of stairs which was made painfully obvious later on. But I digress. My control panel box was built seperately so I could remove it which worked out since my control panel ended up being wider than the doors in my house so being able to move this in two sections was nice. The control panel has three holes in the bottom that line up with corresponding holes on a support in the cabinet itself. I passed some 4" lag bolts through the holes and tightened it all down with a few of hex nuts. I routed the grooves for my black leather t-molding using my Dremel and the router attachment. If I had it to do over, I would either buy, borrow, or steal a real router for the project. The Dremel is just to underpowered in my opinion and made the task much more difficult than it had to be. I also constructed a drop down panel with key lock that allows access to a pull out keyboard drawer for troubleshooting, upgrades, and maintenance. Quarters... We don't need no stinking quarters...No you don't need quarters to play this arcade but if you ask me, you NEED a coin door. Yep its pricey but it completes the look in my opinion. I thought about not getting one and even waited until I had the cabinet put together before I cut the mounting hole for it. When I stood back and looked at it without the coin door something was just missing. Once I orderd and installed the coin door it looked like an arcade cabinet should. Besides its neat to see the coin door light up and have the ability to drop quarters in there and hear them register your credit. I bought my coin door from Happ Controls. You will see that name come up often around here. Damn I hate to paint...If you don't like to paint too bad. Make sure you prime too. A couple of coats of a good primer. THe MDF soaks up paint like a sponge. Then get to it. Paint a coat and sand lightly. Then paint a coat and sand lightly. Then do it again. I painted the majority of the cabinet's outside with a semi gloss off-black color by Olympic. The upper sides of the cabinet I painted with a grey textured paint by Behr. I used a small foam roller for both. The grey textured paint gives the side a cool "laminate" look and made it stand out a little. The inside of the cabinet I just spray painted black solely to help with preventing light leaks. |
|
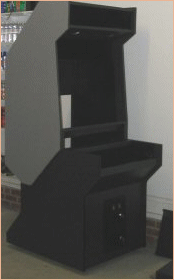 midway through construction 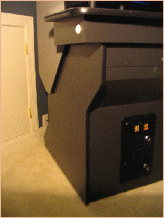 side view enlarge 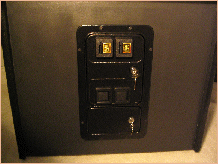 coin door enlarge 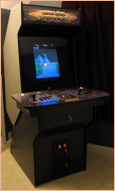 finished enlarge |
intro cabinet controls software hardware artwork links contact